

A Protocol for Upgrading to Adobe Photoshop CS5
Some people measure time on a clock. Others on a calendar. And, there are those of us who measure time in terms of “software life cycles” — the time between major product upgrades. For those of us in the latter category, this is a time to celebrate. Adobe Creative Suite 5 was announced on April 12, 2010, and will be begin shipping at the end of the month.
A month or so ago, I was able to download and Beta-test the new Photoshop release. There are some incredible new features — things like:
- “Content-Aware Fill” — you know that odd shape you get when you stitch together a panorama? This tool will fill the gaps and make the image rectangular WITHOUT cropping away stuff we want to keep; I also think it will help with facial retouching in those tight areas where other tools often pick up dark spots or lines;
- a beefed up HDR section — which, for some users, may obviate the need for third party programs;
- a beefed up Refine Edge tool — which will make complex extractions a lot easier;
- an improved brush tool and interface — so those of us with Wacom tablets can change the way the brush interacts with the image by tilting the brush or applying differing pressures to it;
- “painting” tools — the ability to alter brushes and use color mixing to replicate painting styles — not a replacement for Painter, but an interesting alternative;
- A “Mini-Bridge” that minimizes the need to back and forth between two programs, Ps and Br; and,
- the new “Puppet Warp” tool — which, through some amazing magic, will let us correct posing flaws by simply bending the body; I think it will also be useful in doing some of the things we used to do with liquify in a much more controllable format.
Perhaps most important for Mac users is that CS5 will allow us to take advantage of the full power of our Intel processors — it will run in 64 bit mode. Posts on those features will come in due time.
But, before we get to use all these new tools and exploit all that horsepower, those of us who have an older version of Photoshop, like CS4, will have to successfully upgrade to the new version. Doing that is the topic of this post.
The Risk of Going First — And Some Safety Nets
I know a lot of people who won’t load software until at least two or three updates have been issued. I am not one of them. I ordered the Adobe Master Collection the first moment I could, and I will install it the day it arrives. Will there be issues? Probably. But, I’ve found that Adobe software, when released, is usually stable. However, sometimes there are issues not of Adobe’s making. Once you’ve decided to go forward, here are some things to think about:
1. If you are cautious and risk averse — if you are the kind of person who does not want to take any chance that there will be hiccups in your installation — the cleanest path is to uninstall the old version and all of your add-ins and add-ons, and re-install everything from its original source discs. I know people who do it that way. However, doing so takes a lot of time. I’ve never done it that way and have yet to be punished for taking the route described below. But, I’m aware that there is always a first time.
2. More likely than not, when moving to the Mac 64 bit platform, we will have 3rd party software, usually plugins, that will have to be upgraded. As I write this article, I know that many of the plugins I use, on a daily basis, are not 64 bit compliant. Most of them should be by the time I receive my Master Collection.
However, if they are not, there are a couple of “work-arounds” I plan to follow:
1. I will leave my copies of CS4 installed on my computers until EVERYTHING in the new installation, including the new plugins, is working perfectly. I did the same thing when I moved from CS3 to CS4. I figured that if something failed, the older, stable version, was my safety net;
2. If my plugins are not updated by the time I’m using CS5, I will still be able to use them in CS4. I’ll start in CS5 and work there until I need the plugins. I’ll then save the file as a .psd, and both EXIT and SHUT DOWN CS5. I’ll then re-open the .psd in CS4 — where my plugins will be available and finish off there. Following this route, it is critical to shut down CS5. Both versions should not be running at the same time; and,
3. Another way to handle the plugin problem is suggested by NAPP’s Peter Bauer (more on Peter in a moment.) The “older versions” of the plugins, which are 32 bit, can run CS5 in 32 bit mode. To set that up, right click on the program icon, select Get Info, and activate “Open in 32 Bit Mode”. Of course, this will be like running a V12 Ferrari with 6 spark plugs disconnected, but it is a solution.
More likely than not, by the time most of us get our copies of CS5, the plugins will have been updated. But for those of us who will jump in early, no matter what, the work-arounds should keep us productive.
The Protocol I’m Going to Follow
A couple of years ago, before I started this blog/site, I wrote a newsletter and distributed it by email. One of the articles I wrote set forth a protocol for upgrading from CS3 to CS4. At the time, I had both versions, in hand, and could do the screen shots necessary to illustrate the article.
Unfortunately, as I write this, I don’t have CS5 in hand. Knowing that most of us will be upgrading before I post the next round of content, I’ve decided to use that old newsletter article as the basis for this post. The screen shots may be different (or they may not), but the concepts and techniques are the same.
How do I know they will work with CS5? I asked Peter Bauer, that’s how.
Who’s Peter Bauer? The guy who knows the best way to do everything Photoshop.
Actually, until I met Peter Bauer at Photoshop World a couple of years ago, I didn’t think he was a real person. I thought he was a computer. Peter is NAPP’s “answer man” – the guy who responds to all the tough support questions. The fact that he answered them so completely and quickly led me to believe he was a “virtual person”, not a human being. But, then I met him in the flesh. Peter is both knowledgeable and generous with his time.
So, when it was time to upgrade to CS4, I wrote Peter to get his preferred protocol. I followed it and everything worked perfectly, from Day 1. In fact, it worked so well that, within a week, I deactivated and uninstalled CS3.
Note the “deactivate” part of that sentence. If you want to give your previous version away, or sell it, you have to “deactivate it” before uninstalling it. Adobe keeps track of he number of computers running a product on one serial number. Without a special license, I’m pretty sure the limit is 2 computers. If all one does is “uninstall” Adobe does not know that you aren’t using it. Only “Deactivation” sends the message that the license is not being used. On a Mac, the path to deactivation from within CS4 is: Menus>Help>Deactivate.
Step 1. Preserving 3rd Party Plugins, Actions, Custom Brushes and Textures
The upgrade process is as easy as putting in the new discs and letting them run. However, there are a couple of preliminary steps one must take to preserve and reinstall 3rd party plug-ins, and special things like custom actions, brushes and textures so that you can move them from CS4 to CS5.
Once more, if you are totally risk averse, the preferred procedure is probably to re-install all 3rd party stuff from the original discs or downloads. As anal as I am, that’s still a cumbersome process I avoid.
Before starting, we need to make sure we have the most current versions of all of the non-Adobe stuff – the stuff that will not be installed by CS5. And, we need to note which of those versions are CS5 compliant and which are not.
Non-Adobe Actions:
In saving and re-loading Actions, we work with “Action Sets”, not individual actions. So, it’s wise to put loose actions in a set.
Then, from the Actions Panel drop down menu, select “Save Actions”:

I’ll create a new folder on my desktop, “Saved Actions”, in which they will be saved. Follow the same procedure for all non-Adobe actions. The action sets will be saved with an “.atn” file extension.
Custom Brushes, Styles and Things Like That
One uses Edit>Preset Manager to create sets and save them in a manner similar to the one set forth above.

Here’s a picture of the Preset Manager. A couple of things to note: It, too, saves “sets”. When you first open it, the “Save Set button is likely to be grayed out. By selecting my custom brushes (more than one brush) I got the option to save them as a set. From that point on, the process is similar to the one that saved the actions. Just save them to a clearly labeled file on your desktop. The “Preset Type” drop down menu let’s you save other custom things. Here are your choices:

Just to be clear, by going through this process, we are trying to save all of the 3rd party or custom things that are not a part of CS5 and will not show up in CS5 unless we save them from CS4 and load them on our own.
When we’ve gone through all of the things in the Preset Manager and saved what is non-Adobe, we can Quit CS4. We’re done there.
Step 2. Installing CS5 and Loading the Non-Adobe Things We’ve Saved
Now, it’s time to install CS5 from the original DVD.
Peter reminds us to disable any anti-virus software (I’m a Mac, what is that?) and/or automated programs we might have. When I’m doing an upgrade like this, I turn every other program on my computer off.
After loading CS5, it’s time to upgrade it to make sure it has all of the current components. I use the Adobe Updater which, on the Mac, is under the Help Menu.
Peter also reminds us to get the latest Camera Raw plug-ins,by clicking here.
It’s now time to re-load your custom actions, using the LOAD ACTIONS button in the actions menu. And, in a like manner, it’s time to load the custom things you saved with the Preset Manager using the LOAD function there.

We are not done, yet. We still have one task left, we’ve got to install all of the 3rd party plug-ins, things like our onOne, Imagenomic, and Nik software.
For this task, Peter recommends something I’ve been doing since CS2 – something that has made my upgrades to CS3 and CS4 a lot easier.
Peter tells us to install those plugins to a new folder on our desktops. I’ve been calling mine “3rd Party Photoshop Plugins”. (I’ve also made similar folders for my 3rd party Actions and Presets.)
Once the plugins are loaded, we put them in the Photoshop CS5 folder. Then, we create an “alias” of those new folders and place the alias in the official CS5 plugins folder. The alias tells Photoshop that there are more plugins available and sends the program to the actual 3rd party folders, where it finds and loads them. Here’s my folder set up:

Notice the “3rd Party” folders. I’ve made an alias for each and put it in the appropriate “stock” Photoshop folders.
Here’s what the Plug-ins alias looks like in the Plug-ins folder:

I have a similar “alias folder” in the Presets file.
For the move from CS3 to CS4 all I had to do was move that folder from the CS3 file to the CS4 file and make and place a new alias. I’ll do the same thing when I move to CS5.
There is another advantage to segregating the 3rd party stuff from that which comes from Adobe. If ever you run into quirky program behavior, you can remove the aliases; that will bring the program back to its “native state”. If the problem goes away, you will know it is in the external folder. If it does not, you will know that the things in that folder are OK.
Either way, the “3rd party folder path” is really the way to go.
After the installation is complete, I open a file and run through all of the plugins. If they work, great. If not, I’d do a clean install from their original media. So far, I’ve never had to do a clean install. Everything has worked.
From what I’ve seen, we will want to make some changes in Adobe’s preferences file. I’ll write about them, later.
That’s it. That’s all there is to it. Not very hard to get right.
Once more, I want to thank Peter Bauer of NAPP for generously allowing me to share this protocol with you. As I’ve said before, my NAPP dues are probably the best investment I’ve made in my photography. I get the fabulous Photoshop User Magazine, a web site filled with tips, tutorials and forums, product discounts AND Peter Bauer. Can’t beat that for $99.
(Copyright: PrairieFire Productions/Stephen J. Herzberg — 2010)
Related Posts
 Performance Photography Pt. II
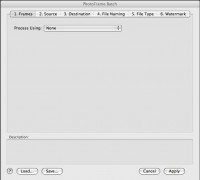 Protecting Our Work: Watermarking Part II — Batch Processing
 onOne Suite 5: Diverse and Powerful Plugins
 www.kelbytraining.com — Part 1
 www.kelbytraining.com — Part 2
7 Responsesto “A Protocol for Upgrading to Adobe Photoshop CS5”
Leave a Reply to Gregory Gittsovich Cancel reply
foo


Thanks so much for taking the time to write all this and help us that are not as knowledgeable. I really appreciate the help and your suggestions.
Thanks for the instructions. Do you know the recommended protocol for 3rd party plug-ins in Windows? We have shortcuts but not aliases. I know, buy a Mac. That’s not in my future.
Keep up the good work.
Sorry, Doug, I don’t.
Hey, Windows people — can someone help Doug out?
Thanks for the detailed info… I have sooo many brush presets in CS4 now I’m ready to transfer everything !
Thanks!!
I think my bacon was saved.
Sometimes these apps are so weird.
Why the heck does it not store the data in the .atn file???
Why does it not automatically import custom actions from the old version?? Or at least tell us how to import them? There must be tens of thousands of Photoshop users struggling with this by every update.
When you uninstall CS4, all the third party plugins, presets, etc, they don’t dissapear. They remain in the previous CS4 folders in the applications folder. From there you can transfer them to the CS5 when you install it or do the alias folder protocol described here.
They say if you uninstall CS4 after installing CS5, you might lose some
Usually, when I install 3rd party stuff I colour the file so I can recognise it inmediately.
Thanks to your information CS5 update went flawlessly!!!