

Busman’s Holiday: Shooting with Hanson Fong and My New Profoto D1 Airs
Webster’s: Busman’s Holiday — a holiday spent following or observing the practice of one’s usual occupation.
A couple of weeks ago, my good friend Hanson Fong, fresh off an appearance at the Houston stop on the Beauty and Beast tour, took a day off and hung out with me. So, how did we spend our holiday? Go fishing? Visit one of Houston’s great museums? Take a hike? No. We spent the day in my studio lighting and shooting with a great model, an up and coming MUA, and my new Profoto D1 500 Airs.
Hanson is no stranger to Houston or my studio. He’s taught several of my Hands on Seminars.
Known around the world for his ability to make ordinary people look great — either during weddings or family sessions, Hanson has spent years mastering the art and science of lighting and posing us normal folks, the people who never get on magazine covers or do fashion spreads. No one can bring elegance to the ordinary like Hanson Fong. That’s what he knows, that’s what he does and that’s what he teaches.
So, how did I lure him into the studio on his day off?
I promised him something different — something he rarely gets to do. I promised him we’d do a fashion/glamour shoot. My goal was for both of us to stretch our horizons. Hanson would get a chance to shoot model Stephanie Vostry. I’d get a chance to turn the tables — to light for the man who taught me so much about lighting. But, this time things would be different. I was going to throw out the tried and true and go to the other side — the side where there are no rules or established lighting patterns, the side where in the words of one of my heroes, Joe McNally you try things just to “… see what happens.”
And, I was going to do it with my new lights — lights I had used just a few times before. With a master like Hanson behind the camera I knew that both my D1’s and I would be tested.
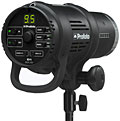
The Profoto D1 500 Airs
I did not part with my Profoto ComPact 600’s easily. They were, and are, outstanding lights — true, consistent and rugged.
But, because I try to stay on the cutting edge for both my writing and studio work, I felt it necessary to make the change. And, with Hanson, one of the world’s best shooters in my studio, I would test whether I had made the right decision. I am pleased to report — the D1’s more than passed the test.
Rather than simply parrot back to you technical specifications, I thought I’d discuss some of the D1 Air’s main features and let you know how I think they help us become better photographers.
Why I Chose the 500 ws Version: Less Is Often More
The D1’s come in 250, 500 and 1000ws versions. I’ve written a lot about how I think the important thing, when choosing lights, is not the maximum output but, rather, the power range — or the number of f/stop adjustments available. My main point: we often buy too much power, use the lights in spaces so small that even when dialed down to their minimum output the lights don’t allow us to shoot at the lower f/stops, like 2.8 or 4, that we want to use to throw our background out of focus. An 800ws light, with but 4 stops of range, will go no lower than 100 ws. That’s a lot of light, especially in a small space.
When buying lights — less is often more. That’s why I look at minimum output more than I look at maximum output.
All of the D1 lights have a range of 7 stops. The 500 best fit my needs, offering: 500, 250, 125, 62.5, 31.25, 15.62, and 7.8ws. The 7.8 is what grabbed me most. My ComPact 600’s had a respectable 5 stop range which bottomed out at 37.5. For my use, in a studio that is 34×22, that’s a significant difference.
One other thing, a feature I wrote about here: The D1’s have 300w modeling lights. That’s a lot of power and will be increasingly important to us as our DSLR’s morph into “video” cameras.
The Digital Read Out
I’ve never felt the need for digital read outs — but, if you do, you’ll be pleased to know that the D1’s have a nice, big, clear digital read out on the back of the light.
Once we understand the way the digital read out works, it can be a very useful tool. Some think that if you dial your light to 5.6, the output at your subject is 5.6. Said another way, they think the readout is “absolute” or “the reality”. It is not and cannot be. Why? Because, we all know that, because of the “fall off” of light, the distance of the light from the subject controls the quantity of light on the subject. Let’s assume that you meter your subject and that, by luck, when the digital read out is 5.6 the meter reads 5.6. So far, so good. But, if you move the light forward the amount of light on the subject will increase; if you move it back, the amount of light on the subject will decrease. That’s a law of physics that no digital light can overcome. But, the digital readout will stay the same — it will say 5.6 although the quantity of light on the subject is either more or less.
In essence, the digital read out is “relative”. Its sole function is to help you move from one stop to another.
So, once one understands the nature of that relativity, the digital read out is an advantage.
Let’s say you take a meter reading at f/8. The dial on the light may say 4. Why? Because the reading is “relative”. The light simply knows its output. It does not know how far away from the subject it is.
Now, let’s say you want to shoot at f/11 — so you need one more stop of light. All you have to do is turn the dial from 4 to 5. One stop — the difference between f/8 and f/11.
The key to “relativity”? The numbers on the digital read out are not the equivalent of f/stops. They are power range numbers. Going from 4 to 5 is the equivalent of one f/stop (doubling the light).
Once we understand this, we can take full advantage of the digital read out. Up one stop, push in the knob and turn it one click and the read out will go up 10/10ths. Or, click your way up 1/10 of a time by just turning the knob without pushing it in.
To their credit, the D1’s are dead on in their incremental adjustments. If I went from 4.2 to 5.2, I got a full stop. From 6.3 to 7.3, a full stop. They were so accurate that I stopped metering between changes. I trusted the digital readout and it did not fail me.
And, to make things better, as you will see next, I never had to go to the lights to adjust them — I did it wirelessly.
The “Air” System: Wireless Control — A Big Advantage
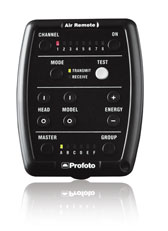 Simply stated, the Profoto “Air” system allows us to wirelessly control and trigger our Air equipped lights through a camera mounted “Profoto Air Remote” transmitter. You never have to touch the lights — all you have to do is touch the remote. Sort of like sitting in a comfy chair in a media room.
As the owner of a Profoto D4 generator I am addicted to the “remote control” of my lights. On the D4, I accomplish this by tethering to my Mac (written about, here.) Once I started tethering, I never wanted to go back. Walking over to the generator or to each head to adjust it, while good for my fitness, often took me out of my creative flow.
With the Air system, I have the wireless equivalent of “tethering”. I can turn on my lights and adjust them, either individually or in groups, from the transmitter. That is a huge savings in time, focus and energy. And, to be honest, I find myself much more willing to make changes in order to seek perfection — because the changes are so easy to make.
A couple of notes: The D1’s are fairly light and compact and will work well mounted out of reach (like up on the ceiling as a hair light.) Being able to change their output without climbing a ladder to reach them is a big advantage. Apparently, the early production models did not allow one to turn them on remotely; but, once on, they were infinitely adjustable. From what I understand, there is a firmware upgrade that deals with this. New models can be turned on from the remote. Older ones, like mine, can be upgraded, for free, by the factory to meet this new spec.
Triggering and Metering — Dual Option
Profoto has given us the freedom to choose between two options for triggering our D1 Airs.
First, is the Air system itself.
And, second, is through the use of a Pocket Wizard.
I’ve set mine up to do both. I have a lot of Pocket Wizards — I use them both in the studio and to control my off camera flash units. So, when I switched from my ComPacts to the D1’s, I simply left a Wizard attached to each light stand. All I had to do was get a new cable to go from the Wizard to the D1. So, any time I want to use the Wizards, I can.
I thought I would use them a lot. But, truth be told, I haven’t used them at all. I’m not saying I never will — there may be situations where they will do something I can’t do with the Air system, but I haven’t run into that situation yet.
I mention this because when the D1’s first came out, there were wails of angst from many on the ‘net claiming that Profoto had abandoned the Wizard group and that the Wizards could not be used with the D1’s. That statement is categorically false and no one who had ever seen a D1 Air would have ever said such a dumb thing.
(BTW — if you are totally convinced that you will never use the Air system, you can buy the D1’s without it. But, I truly think the wireless remote system is worth the extra cost.)
The second false rumor was that you could not use a Sekonic meter with the D1 Airs. Again, not true.
Here’s the deal: You can meter using your Sekonic meter but you cannot use a built in Pocket Wizard transmitter to do so. Instead, you put your Sekonic meter into the “flash receive” mode, fire the lights with the Air transmitter, and read the setting on the meter.
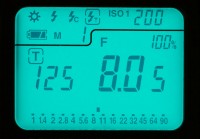
Step 1: Put your meter in the receiving mode ( I call it the Lonely mode because it is unattached to anything and not hooked up) — it’s the lightning bolt without an initial and not the lightning bolt with the “c” (which is for a cord connection) or the “t” (which is the transmitter mode). (In this image, the box is around the PW transmitter mode. When over the Lonely lightning bolt, it looks the same.)
Step 4: Push the “Test” button on the Air transmitter. The lights fire. Voila! A reading.
I’ll admit that this is not as easy as it is to meter a pure Wizard based system in which you only need push one button on the meter. But, once used to it, I had no trouble doing it.
And, the payoff for the extra button push is significant: We don’t have to move to adjust the light we just measured; we can adjust it from that very same transmitter, stay in our spot and meter again.
(For those who just want to push one button, you can connect the Air Remote to the meter, use the “C” setting and, when you push the button, you’ll get a reading on the meter.)
Integrating My Non-/Air D4 Generator
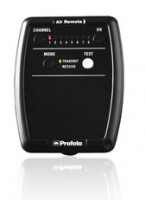 One of the reasons I thought I’d use the Wizards on the D1 heads was that my D4 generator was triggered by a built in Wizard. I figured that during the times I used lights from both systems, I’d use the PW’s to trigger them all. But, I haven’t. Instead, I got a Profoto Air Sync, plugged it into the generator and used it to trigger the lights. To be clear, the Air Sync will not allow me to control the lights from the Air Remote. To control the lights, I use my Mac running Profoto Studio Software (which is free and flawless). I hook my D4 to the Mac using a USB cable. If I want to work without the cable, I can use the Profoto Air USB, a dongle that replaces the cord and establishes a wireless connection.
Some General Impressions
Like all Profoto lights, the D1’s are consistent — both in color temperature and flash duration. I’ve measured the output of every Profoto head in my studio (4 D1’s, 4 Acute heads for the D4 generator, 1 Acute head for the 600BR, and one Ringflash) and they are all within 30-50 Kelvin degrees of each other. (I measured without any modifiers on the head. Often, different diffusion materials can affect the Kelvin output of a light — and if you are having color mismatch problems, that might be the place to look first.)
I like the new “build” of the D1’s. They are lighter and have a convenient, built-in handle. They are built to reflect at 77 Degrees without the addition of a reflector — one less thing to carry around. And, though light, they feel rugged.
But, what I like most is that they are wickedly fast — they recycle quickly and match the times of my D4 generator. For anyone who has used other mono-light systems, this speed bump serves us well when trying to capture fluid movements in things like fashion/glamour sessions. (I have the “beeps” set on all of my lights to let the model know not to move until he or she gets the audible signal that the lights are ready for the next pose. With these lights, that beep comes in within a second or so.)
OK, so much for the lights — it’s on to the Busman’s Holiday.
Hanson Fong In the House
The basic plan was to try some new things — lighting patterns I had thought about but never really used. Here are a few of the things we did.
High Key Head Shot
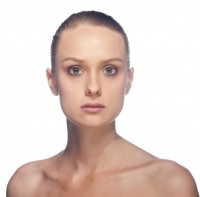 I almost never shoot high key — I’m a moody, low key kind of guy. But, with high key in such great demand, I figured I ought to shoot some. And, inspired by a post on Scott Kelby’s blog, I decided to try a new lighting pattern.
Simply stated, instead of using white paper as a back drop and lighting it carefully to avoid shadows from the subject, I used a Photoflex 7′ OctoDome and a D1 head. The dome became the backdrop. I metered it to f/6.3.
To light Stephanie’s face, I chose a Paramount or Butterfly “glamour” pattern.
The main light was a D1 with a Profoto Softlight Reflector on it. Instead of using a reflector for the fill, I used another D1 head, this time in a CreativeLight soft box. Both lights were mounted on the same Matthews Magic Stand — the Softlight Reflector on the built in boom and the Creative Light on the first riser of the stand. (This set up is the subject of my post here.)
Why the two lights on the same stand? Because, I’m used to working alone. I don’t have someone to hold a reflector, I have reflector stands. But, because the light placement in Paramount lighting requires precise placement — miss by an inch and it won’t look good — every time the model moves the lights have to be moved. By putting everything on one stand, I can easily make the adjustments by simply pushing the wheeled stand to its new position.
The main light was set to f/11 and the “fill” to f/4.
One thing about this lighting pattern: As Scott points out, because the light from the OctoDome wraps around the face from behind, out of the camera, the image will look faded or wiped out. Don’t worry. The solution is easy. In your post production, you simply use the “Blacks” slider to bring back in the full range of facial color.
I fired off a couple of test shots. This headshot is one of them. From that point on, I put down my camera and became a grip. All of the remaining images in this post are Hanson’s.
Derivations On A Theme: Using the Light As a Structural Element
(You can double click the image to enlarge it.)
With Hanson shooting, we decided to get one more use out of the OctoDome before putting it away. We decided to use it as an element in the image itself.
To do so, we lowered the light to floor level, moved Stephanie forward, and adjusted the lights, accordingly. We used the same main light on the Magic Stand and, to add some sparkle on the floor and fill in Stephanie’s face and eyes used a 6′ Profoto strip box as a fill, placed well behind the stand and angled up at 45 Degrees. One of the things I like best about this image is the is the reflection on my cement floors and the shadow it throws forward.
I’m going to try this pattern again and, to capture more of the reflection, I’ll shoot with a wider lens.
This short, down and dirty video,show the set up. (I’ve been either doing videos or making drawings of set ups to cover for my “grey moments”. I keep them all on my computers in an interactive NoteBook from Circus Ponies Software.)
A Couple More Images
We didn’t stay on the odd side of lighting for the entire shoot.
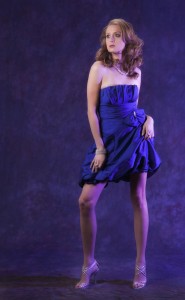
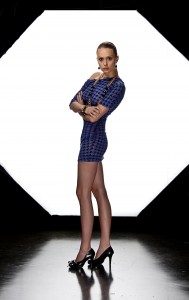
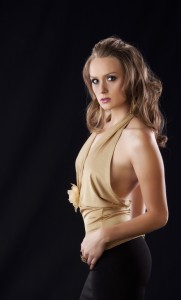 The last part of the shoot focused on what I would call “fusion posing” — Hanson mixing his traditional, elegant portrait and wedding poses with the world of high fashion. We continued to use the Profoto Softlight Reflector and Creative Light soft-box set up discussed earlier. For the low key shots, we added a hair light (indirect lighting from a strip box 14′ up and with the sides parallel to the floor). And, for the “Blue Dress” shot, we added a purple gel and allowed it to spill over a bit onto Stephanie.
All in all, a perfect Busman’s Holiday.
Contact Information:
(Copyright: PrairieFire Productions/Stephen J. Herzberg — 2009)
Related Posts
5 Responsesto “Busman’s Holiday: Shooting with Hanson Fong and My New Profoto D1 Airs”
Trackbacks/Pingbacks
- Prairiefire hosts Hanson Fong | Profoto Blog - [...] Blogger No Comments Stephen J. Herzberg of Prairiefire Productions has posted a great account of…






This is a great article Steve as always you and Hanson are great teachers and you inspire us all to be better photographers.
Great article Steve, and what a great day it must have been shooting with Hanson and Stephanie. I’ve been struggling with trying to decide what lighting equipment I should upgrade to for my home studio. I knew I wanted pro quality lighting, something that could be used in a small space but that would be expandable and would work well as I move into a commercial space in the future. Your article helped clear up the mystery and I am now a proud owner of a Profoto D1 Air 500 kit from Houston Camera Exchange. I couldn’t be more pleased with the lights and thanks for writing such an informative and detailed article. Keep up the great work!
Great article/review. I was in the market for studio strobes and you helped me make my decision.
Great review, pictures and video. Thanks for the info. I’ve done a bit of research and like the results I’ve seen from the D1. However, I find it odd that the reflector is built in. Did you have problems with hot spots when using large soft boxes due to this limitation?
Hi Jason,
I have not found a significant difference between the way the D1’s light my boxes and the way my Acute heads, without reflectors, do.
When the D1’s were announced, and before any of us had them, there was speculation that the built in “reflector” would create hot spots; but once the lights got out into the field I have not heard those concerns expressed by people with the lights. I suppose the results would vary my box and how it is used; for example, I know if I were to take out the inner diffusion panel the light the light would be reflected less evenly. Many of my lighting patterns are built around John Woodward’s teachings — I use indirect light, light with reflections off the edges of the boxes and not directly with the light from the center of the box — and in those patterns there would not be a hot spot under any circumstances.
Bottom Line: I love my D1’s. They have performed flawlessly and seamlessly integrate with my D4 and Acutes.