

Protecting Our Work: Watermarking Part II — Batch Processing
In the last post, we created a “brush” to use when signing or placing a copyright notice on our images. Using the brush, one image at a time, works well. But, when we have a big job, a lot of images we want to protect all at once, it’s not the way to get the job done.
That’s where “batch processing” comes in.
There are lots of ways to batch process a mark. One of the most common is to create an action. However, doing so is a bit complex because we need to create an action that will resize and place the mark where we want it on images of different sizes and orientations. I’ve been down that path. It works, but it’s a lot of work.
Fortunately, others have done the heavy lifting for us. In this tutorial, I’m going to write about the two Photoshop plugins I use to batch mark my images.
But, before we get to the plugins — a few preliminary points — one philosophical and the others technical.
First, the philosophical: I still have difficulty “defacing” my photos with a watermark. I work hard to perfect my artistic vision. I find it tough to plop something on it that will make it more difficult for the viewer to suspend disbelief and truly engage the image. So, when I choose to mark them, I try to do something subtle, like putting my name and either the word “copyright” or the “©” symbol in a lower corner. This will let printers know it is a copyrighted image; but it won’t protect us from those who will scan our images at home and crop them to take the mark off. For the greatest protection, we have to put the mark right across the center or on a face — someplace essential and difficult to clone out. Yuk!
Second, the technical: You will need a “mark” for the plugin to place. All you have to do is follow the steps set out in Part I on this site — until you get to Step 5. Instead of “defining a brush”, you simply Save your work. I actually save my work in several formats and sizes. For starters, I make them big — at least 3×6″s so that on large pictures they’ll show up. Then, to give myself the flexibility to use the different approaches below, I save them as .psd’s and .pngs. I use the .pngs in PhotoFrame Professional and the .psds in Watermark Creator. I know people who also maker them in both horizontal and vertical formats. This is all easier to do than to write about. You create your mark and then save and rotate it in all formats until you have your bases covered.
Finally, you need a folder of files to process. Since most of my “proofs” are circulated for viewing on a computer, whenever I finish an image, I run an action that saves it in three forms — a .psd, a Hi-Res .jpeg for printing, and a Lo-Res .jpeg with sRGB resolution(for the web). I use a script from on of my favorite Photoshop Guru/Personalites, Russell Brown, to do this — Dr. Brown’s 1-2-3 Process. Dr. Brown’s site has a lot of free stuff and some great tutorials.
So, with a file full of images designated for marking, it’s time to batch.
Technique 1: onOne Software’s PhotoFrame Professional 4.5 Batch Processor
One of my favorite programs in the onOne Suite is PhotoFrame Professional 4.5; I use it, often, to add frames and textures to my images. It’s one of my favorite differentiation tools. With it, I can do things that many of my competitors cannot.
If that were all it did, it would be an incredible tool. But, it does more. Whether you are adding a frame or not, in its Batch mode, it will add watermarks.
Here’s how:
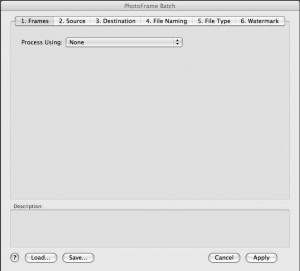
When you open PhotoFrame Professional 4.5 Batch Edition, you get this window:
1. Frames — if you are going to add a frame to the files, you choose it here. If you are simply adding a watermark, you can skip this step;
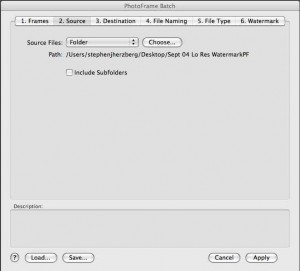
2. Source — Here is where we tell the plugin the folder that holds the files we are going to mark. If you have all of the files open in Photoshop, the drop down menu allows you to choose “Open Files”;
3. Destination — let’s you tell the software where to put the finished files when it is done;
4. File Naming — is exactly what it says;
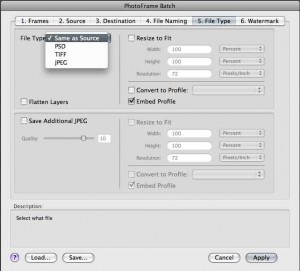
5. File Type — is also very straight forward;
What’s very cool is that the program allows us to make multiple copies with multiple resolutions. So, if you are going to both print and put marked images on line, you can do both high and low resolution .jpegs here. (If you know you are going to end up in onOne’s Batch processor, you can skip the step I take in Dr. Browns 19-2-3, and make your multiple files during the batch process); and,
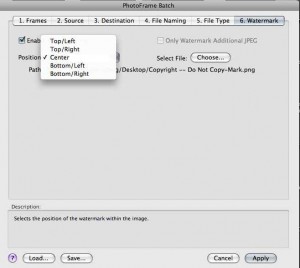
6. Watermark — OK, now it’s time to get to work — but we’ll find it really isn’t “work” at all. It’s really pretty easy.
First, we have to enable “Watermarking” because the software has to know we’re not just here to add a frame.
Then, we get to decide where we want to put the mark. The drop down menu gives us a variety of choices. I usually use the least obtrusive placement which, for most of the things I shoot, is the lower right corner. But on the “trumpets” image, the corner was so dark that placing it there would have made it easily cloned out. So, I centered it.
Then we use the “Choose” button to tell the software where to find the mark we want to use.
7. Hit “Apply” and sit back while the plugin marks all of the files in the folder. Depending on how many are there, it can take a while. I’ve done hundreds at once. I simply walked away and watched an episode of Burn Notice. (Actually, it was a lot faster than that; because I was not making image copies at the time, 30 Low Res images took less than a minute.) When I came back, everything was done and I had a message on my screen telling me that all 29 images had been successfully marked.
Using PhotoFrames 4.5 Professional, you can easily mark a lot of images with very little effort.
onOne Software has graciously extended a substantial discount on their products to my students and readers. Until Mar 1, the price for the Suite is $299.99. After Mar 1, it will go up to $379.00 which is probably the lowest price in the country. To learn more about the discount, please go here.
Back Story — The Making of This Image
I’ve been asked to write about how I capture some of the images used in my posts. So, here’s the Back Story of Trumpet Silhouettes.
I have to confess. I’m a Friday Night Lights junkie — not the TV show, but the real thing. For the past four years, I’ve been one of the “official” unofficial photographers for the Houston Memorial High School Mustang Marching Band. Why? Because my daughter Jenny has been in it since her freshman year. She marched her first year and has been in the Color and Winter Guards ever since. No images have been more fun to create than the thousands I’ve done at the football games and Band and Guard competitions.
So, how did I get the trumpet silhouettes? This is an example of using very strong backlight to one’s advantage. I spot metered on the sky, knowing the players would go dark. Had I used any form of dynamic metering, the camera would have struggled to average things out and I would have gotten a blown out sky and mousy picture of the kids — a really mediocre picture. I wanted a silhouette. And, by metering for the sky and deliberately underexposing the players, I got one.
But, that was just the capture. From there, I still had a little work to do in post production.
First, I used Nik Software’s Viveza to darken the trumpet players a little more — to take out the bit of detail that had been captured in the original image.
Second, I used a Levels layer adjustment to darken the sky. I made a “global adjustment” which darkened the kids a bit more, too.
At that point, I had a great looking image with a blue/gray sky, which I saved.
But, never content, I did what I usually do with an image I think is finished, I went into onOne’s PhotoTools Pro and Nik’s Color Efex Pro 3.0 and started to fiddle around. I usually just run down the menu of effects to see if something hits my spot. And, one did — Nik’s Burnt Sienna — which changed my sky to fire.
By metering correctly at the time of capture, and by adding some flair in post-production, I got exactly what I wanted, and more.
Technique 2: NAPP’s Watermark Creator
OK. I know I’ve written this before, over and over but — the best investment I’ve made in my photography is my National Association of Photoshop Professionals membership. By far and away the best investment. I get so much for so little — the great Photoshop User magazine, Photoshop User TV, access to a great website replete with advice and tutorials, and access to a help desk run by the amazing Peter Bauer and my favorite professional conference, Photoshop World. With all of that help, I’ve gotten better at Photoshop and my post production.
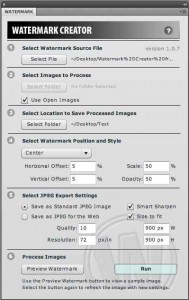
If you are a member, there is another benefit. You can download NAPP’s Watermark Creator — and extension panel for Photoshop that offers another way to mark our images, either individually or in batches. (Once you’ve downloaded and installed it, you will find it under Window>Extensions>Watermark.) Start it up and you get this:
Many of the concepts are similar to those used in PhotoFrames Pro; so, I’ll not go through each step. But, there are some significant differences and those are what I’ll explore.
1. Select the watermark file.
2. Select the images to mark.
3. Select folder for marked images.
So far, nothing exciting. But in the next few steps, the features of this program start to shine.
4. Select Watermark Position and Style
What’s cool here is that we are given choices of where to put the mark, top, center bottom, and an option with each to go to the left or right. To get a more exact placement, we can set the horizontal and vertical offsets.
How do we know how much offset to use? We use the preview button, below and adjust the placement until it is perfect.
Note that WM Creator also lets us adjust the size and opacity of the mark. In the example, below, I used the center at 100% scale and 50% opacity.
5. Select JPEG Export Settings
Once more, we are given a lot of control over our marked images. I’m particularly impressed with the settings for “Save as a JPEG for the Web”. If we use this function, we get an image in sRGB color space and with 72 pixels/inch resolution.
6. Preview, tweak and run. That’s it. Simple and effective.
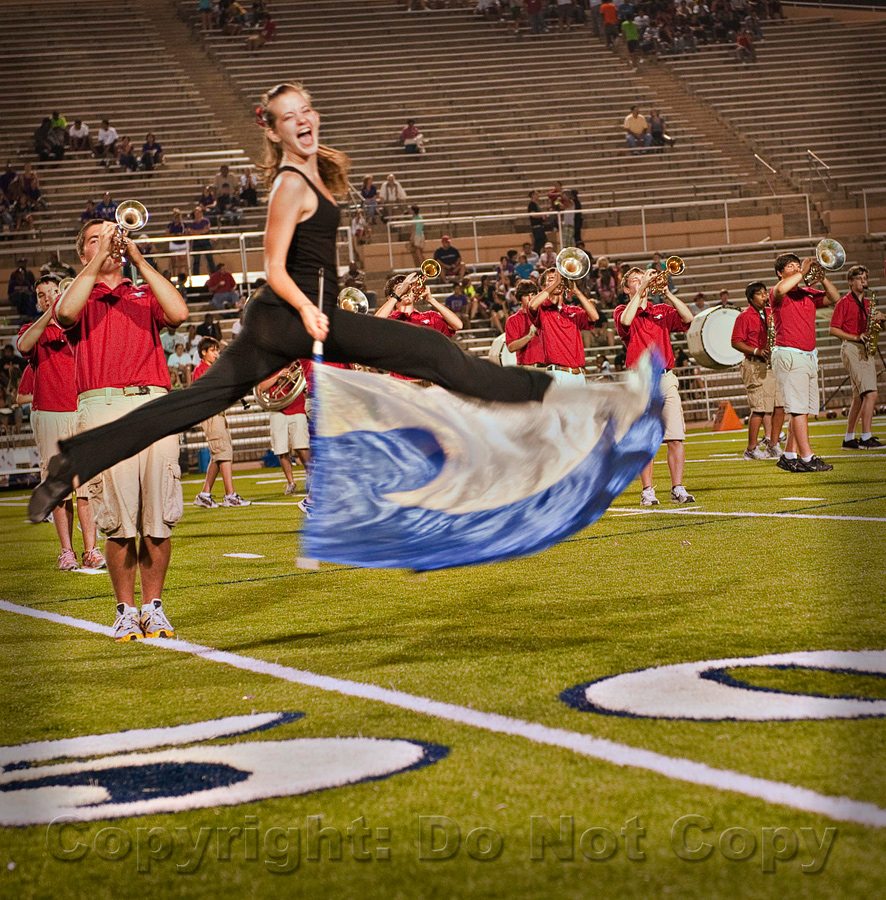
Here’s an example of a file marked with WM Creator:
Watermark Creator, while very easy to use, brings the power of precise placement to the task.
Both programs provide fast and simple paths towards protecting our work.
Back Story: Why this image?
Simple. That’s my daughter, Jenny. Need I say more?
But Wait! There’s More!
Update:
Jack Reznicki just dropped me a note to remind us all that, as he notes, watermarking is at best “a 1% solution” — the other 99% is registration at the copyright office.
I’ve written about this before. We can hope for the best — that people will respect our rights and that watermarking will remind them to do so. But, we must prepare for the worst — we have to take legal action to register and enforce our rights.
As I’ve written before, I am in the middle of a lawsuit in which I am suing someone for violating my creative rights. Fortunately, I had registered my images. Had I not, my cause of action — though morally and legally correct — would have been difficult, if not impossible to pursue. Most lawyers will not take a case to enforce a violation unless the image has been registered.
Register. It’s easy. It’s fast. It’s cheap. And, it’s essential.
(Copyright: PrairieFire Productions/Stephen J. Herzberg — 2010)




I have discovered the free service http://picprotector.com to embed my data into photos in invisible way. This service supports Google Picasa and Flickr. It is possible to use Mydrmspace HLT (Hidden Link Technology) to create modern banners directly based on invisible singed pictures. Regards.
Thanks for the great information. I agree NAPP membership is the best investment that I have other made. Easily I save $500 per year on B&H shipping alone!
My daughter is also in color guard (she marched Drum Corp in 2008 with the COLTS!!
Great info, Steve! Thanks for another great newsletter!