

Live: PrairieFire @ Photoshop World — Day 3
The last day. And, my head is spinning. I’ve learned so much. Sort of. From experience, I know that no matter how much knowledge I cram into my head during a conference or seminar, I really have not learned it until I use it.Those who study the philosophy of education draw a distinction between “knowing that” and “knowing how”. “Knowing that” is having factual knowledge — much like I now have after attending all of these lectures and demonstrations. “Knowing how” is far more important — it is the ability to actually use the data in one’s head in a productive way.
So, it’s time for me to make sure I turn the “that” into the “how” — time to put the techniques to use and actually master them.
I think that holds true for all of us who study photography. How many of us have attended a seminar only to “forget”, in a short time, what we’ve learned? Research tells us it’s a lot of us.
So, my mission is to use the techniques I’ve learned — and to write about them, here.
What I Learned in Class, Today
A. From the Amazing Russell Brown — Camera Raw and Smart Objects
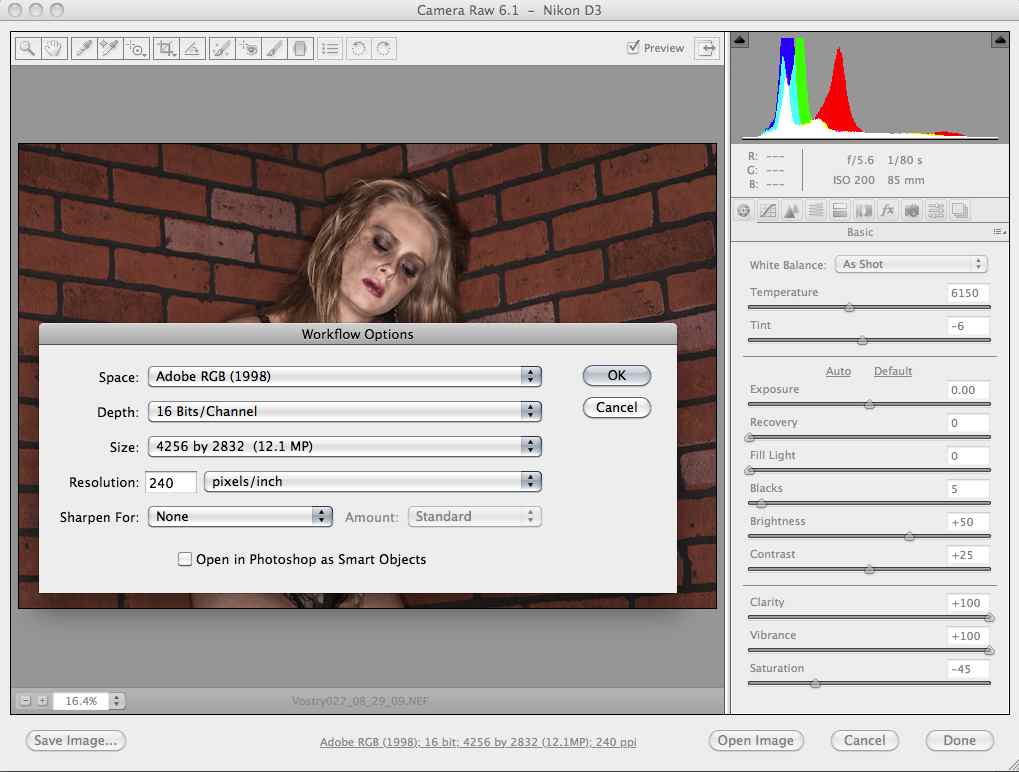
1. Setting Workflow Options for Specific Cameras — Here’s something I did not know: The “Workflow Options” in Camera RAW are camera specific. Once you’ve set them for a camera, they will remember that camera and open up the image with the proper settings. Here is the window:
We get to the window by clicking on the line on the front page of the Camera RAW processor that starts “Adobe RGB …”.
We set this window to reflect how we want the images from a specific camera to be treated; once set up, all images from that camera will be handled with the set workflow options. These settings reflect how I treat the images from my Nikon D3. I always want them at 16 Bits and at the greatest resolution for the chip, 12.1MP.
Obviously, the trap here is that if, for some reason, we have not set the workflow options correctly, all of the images from a camera may be processed at less than optimum settings.
Lesson Learned: These settings carry over. Set them correctly and reap the benefit. Fail to do so, and we may be getting less from our cameras than they can produce.
2. Holding down the OPT/ALT key when opening an image from Bridge will hide Bridge. How cool is that? How many of us have a cluttered desktop when working with Photoshop and Bridge at the same time? No more.
3. A good reason to open a Camera RAW image as a Smart Object in Photoshop is that it will embed a copy of that image in the file. So, if we move the image to another computer, we will still have the original RAW image with us. Too cool for words.
B. From Dave Cuerdon
1. Here’s one I really like. When trying to place a drop shadow from the Layer Style window, most of us use the “Angle” circle with the little clock hand like dial. It’s really hard to get it just where we want it using that technique.
Dave showed us a better way. We can grab the shadow with our cursor and move it around so that we get it exactly where we want it. When we are moving it, the dial turns. Here’s a short screen-shot-video that demonstrates the point: Just click and watch.
But Wait! There Will Be More!!!
There are things that need to be done, before I can write about them.
One of my favorite teachers, Ben Willmore gave an amazing class on painting with light. Just as fine chefs carry around holsters full of knives, guys like Ben have gun belts full of flash lights and high powered, portable beams.
One tip from Ben — start with the face. Since your subject will have to be sitting still, get the face first. Once free to move facial muscles, most people can hold the rest of their bodies still.
I’m going to work a lot harder on mastering blending modes. Now that I’ve seen what they can do, I’ll pay more attention to them. I’m particularly interested in shooting a subject against a neutral gray wall and then using a blending mode to replace the backdrop. I’ll try it and if I can make it work, I’ll write about it.
And, I will do more self assignments. Once more, my favorite event at PSW was The Art of Digital presentation, moderated by good friend Jim DiVitale. Jim, Julianne Kost, Joe McNally, Joe Glyda, Vincent Versace, Jay Maisel, John Paul Coponigro, and Moose Peterson showed and discussed their work. Much of what was shown was shot on “self-assignments”. If the world’s best photographers take the time to do new things, to stretch, to scratch their creative itches, I will, too.
Final Thoughts
What an amazing conference! As I’ve mentioned before, the only problem I had was choosing between very strong classes in competing time slots. My solution? I’ll probably go to both the East and West Coast versions next year. There’s no way to take it all in in one fell swoop.
Thank you to NAPP, Adobe, Kelby Training, and all of the incredible instructors who sent me home enthused about what I had learned and passionate about what I am about to do.
(Copyright: PrairieFire Productions/Stephen J. Herzberg — 2010)





Leave a Reply