

Hot Topics: Work in Progress
Usually, I research and write several posts at a time — and then publish them when I think they are “ripe”. However, some times I hit set backs — things that make an article tough to complete. Here are some of the things I’m working on — complete with some tips:
Update:
Obviously, losing my computer and a lot of my equipment has pushed the schedule of my “works in progress”. Some of the tasks cannot be done before I get replacement equipment. But, I’ll get these stories done. In addition, I’ve started playing with the Topaz line of filters; I like them a lot and will be writing about them, too. And, finally, I expect to find a lot of stuff at Photoshop World that will stimulate posts. Sorry, for the delay on the promised articles — but they will be done — soon, I hope.
Off Camera Flash: Learning to Love Nikon’s iTTL System
I’ve run into a major detour in an article I’m writing about learning to trust and use Nikon’s i-TTL (intelligent Through-The-Lens flash system). Currently the article is code named “Hot Flashes”. Why? No, it has nothing to do with menopause. It seems that like many of you, I’ve run into some serious overheating/shut off problems with my new Nikon SB900 flash that I’m using as a “commander” flash on my D3. Before writing the broader article about learning to trust and love iTTL (which I do), I want to get to the bottom of the overheating issue.
Is it operator error? Are we making mistakes using our flashes?
Is the speedlight “over engineered” and shutting off prematurely? Should we disable the cut out function?
Or, is it really overheating? If so, is it a hardware problem — one that remains unfixed by Nikon’s firmware update? Or are there external factors such as batteries that are either influencing or causing the problems?
My sense is that it is a combination of all of the above, made worse by people who shoot “too fast” (whatever that is), and I hope to sort some of this out, soon.
There have been a lot of fingers pointed at batteries — claiming using the wrong ones is causing the heat build up.
Eugene Thomas, of Thomas Distributing, a one stop shop for all things battery, generously took a lot of time to explain “Battery 101” to me. Using what I learned, I’m going to run some battery tests — Sanyo Eneloops v. the different brands of NiMh batteries I’m now using. Reader reports strongly favor the Eneloops; there is a body of users who claim that they help minimize SB900 overheating. And, the Eneloops can spend a lot more time on the shelf or in the camera bag without discharging.
I’m also trying to find people at Nikon who will share their wisdom and advice on the subject.
You, too, can contribute. I’d love to know your experiences and get your ideas as to what’s going on and how you’ve solved it. I started a very productive thread on one of my favorite websites, Nikonians. You can read it here. If you have ideas or answers, I’d love to know them before I write the article. Please use the contact section of this site to send them to me.
The SB900 is a great flash with many advanced features. I look forward to completing the article in which it plays a major role.
Little Things Enable Big Things
As I struggle to gain some traction on the “overheating issue” I do want to share with you some accessories that I’ve been using to make my off camera flash work more productive. There’s no reason for you to have to wait for these tips — which I’ll write about, in more depth, in the iTTL article.
From Joe McNally, and his buddy Syl Arena, and from my friends at TriCoast Photography, I’ve learned the importance of precisely placing the off camera flash and its modifier. When we work alone, most of us put the units on light stands or clamp them somewhere.
However, if we have an assistant, there is a better, more precise way, “the human, brain driven light stand”. Simply stated, we put the flash in the hands of an assistant and let him or her aim it where we want it. “Um, can you raise it up a bit?” “Now, a little more toward the side”. Instant control without having to put down the camera or move from the shooting spot.
But what do we do if we want the light placed where our human stand cannot reach? We put it on an arm extension — often known as a stick. Back on the farm, I learned to attach all kinds of things together with bailing twine and duct tape (known in our industry as gaffer’s tape.) The farm solutions worked, but they were not elegant.
So, leave it to Syl, Joe, TriCoast and a host of other people to figure out a more elegant solution for those who do not wander around in bib overalls with pockets full of twine.
Enter the “painters poll” — that extendable pole, upon which painters put rollers — used to reach places beyond arm length.
The poles are easy to find — just go to any Home Depot, Lowes, or paint supply store. Try them out — there are a lot of varieties. I chose the pole Joe and Syl use, a Shur-Line that extends from 4-9 feet. The thing I like most about it is that it has a trigger locking system that is both adjustable and solid.
But, because they were made for painters, not photographers, they share one characteristic. They have a “male” threaded fitting on the end. Most are 3/4×5 (the shaft is 3/4″ and there are 5 threads per inch); this is a wide, coarse thread — made for the threads on the female end of a paint roller.
So, how do we attach our flashes to the pole? Gaffers tape would work — but it is ugly.
The solution? The Kacey Pole Adapter sold by Midwest Photo Exchange. The Kacey threads onto the pole and converts the end to a 5/8 baby pin — the same pin we find on our light stands. Once the adaptor is in place, we can put our flash fixtures on it — just as we would on a stand specifically made for photography.
One IMPORTANT NOTE about mounting the Kacey on the painter’s stick — You must use a very strong thread locking compound like LocTite. If you don’t, the weight of the fixtures on the end will cause the Kacey to turn and loosen up because the threads on the pole are so coarse that they will give way easily. Keeping the threads from slipping is not difficult to do. I put #271 Red LocTite on the threads, mounted the Kacey and tightened it AND let it dry for 24 hours. I have a rock solid fitting that does not slip — even at extreme angles. (You can get small tubes of Loc-Tite at your hardware or auto parts store.)
In picking a pole and mounting the Kacey, think of one thing — you have some very valuable equipment on the end of that pole that you do not want to drop on someone’s head. That’s why you have to make sure you have a very solid connection between the Kacey and the pole and between the lights and the Kacey.
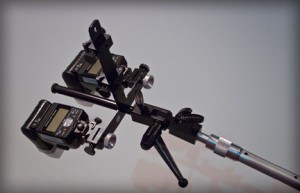 So, what do I put on the end of my pole? Either a single Speedlight or one of my favorite fixtures, the Photoflex DualFlash Adapter Kit. Here’s what I like most about the Photoflex — it is a turn-key operation. It comes with an “angle mount” with built in umbrella holder. It will take two Speedlights (actually 3 if you put one behind the pole) or two Speedlights and 2 Pocket Wizards should you choose to use them. Everything about the DualFlash is well thought out. A very nice touch is the way the flashes attach to the hot shoes; this is a precision fit mechanism AND there is a gap under the flash so there is no danger that the pins will touch metal (which can short out the flash.)
If I want to diffuse the flash, the bracket will let me mount one of my Creative Light shoot-through umbrellas, or a Matthews Road Rags diffusion panel.
One note about my dual flash set up: Le’t not get confused. If we are shooting iTTL, in Aperture Priority mode, the way Joe McNally usually shoots, using two Speedlights does not double the amount of flash. It gives you a bigger source of flash, will recycle more quickly, and may save battery power, but it does not double the output of the flash. Why? Let’s say we are shooting Aperture Priority at f/8. In iTTL, the camera is reading the light and telling the strobes to put out just enough flash to give a proper exposure at f/8. The amount of flash needed is constant. Whether we use one, two or three strobes, the subject only needs so much light. But, if you are shooting the flashes in their manual mode, not controlled by iTTL, that is a different matter. I’ll write more on this when I get around to writing my iTTL article.
Note: that fitting at the end of the pole — the one with the knurled handle — is the Kacey. Without it, none of this would be easy.
Finally, I’ve added my own wrinkle to the McNally/Arena set up: I bought a fish fighting belt to give to whomever is helping me by holding the pole. Why? Because the thing gets heavy. The more you put on the end, and the more so as you extend it out, the heavier it gets; Jen tells me it has something to do with the law of “torque”. Take that sucker out 9 feet with a couple of strobes on it and the leverage will make a strong person weak. After struggling with this, myself, I came up with a solution.
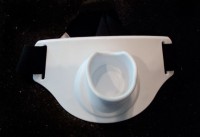
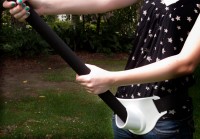
When I fished saltwater, as a small kid, we wore belts with little pockets on them. We stuck the rod ends into the pockets and gained control of the heavy load — rod, reel, and monster fish. So, I bought what is known as a “fish fighting belt”. Here’s how it works with the pole.
I’ll be back with the complete discussion of iTTL, soon.
Self-Assignment: Shooting What’s Around Me and Right Under My Nose
I’m a pretty serious fisherman. I’ve fished tournaments and have been a guide. Most of my fishing has been done at on a lake on which I have a cottage in the Northwoods of Wisconsin. What does this have to do with photography? You’ll see.
For the first several years I fished my lake, I’d get in my boat and go to the other side of the lake. Or, to the bays far to the south of me. Or the shore far to the north. In fact, for many years, I never fished in front of my own cottage and dock.
Why? Because, somehow, I had convinced myself that I had to go far away to get find the best places to fish.
Until, one day, I decided not to. I moved my boat 40 feet into the lake, held position with my trolling motor, and fished a weed bed that is directly in front of my cottage and one that I’d looked at for all the years I’d been there. Bang. A fish. And, another. And, another. Right in front of my cottage, I had found one of the hottest walleye spots on the lake. Over the years, I’ve caught and released several big musky from the same weed bed. And, after moving to Texas and learning how to “worm” — I took the technique up to Wisconsin and caught and released some great small mouth bass — in the same weeds.
These days, I still cross the lake to fish — partly because I like to cross the lake. But, I am also very aware of what’s around my home base.
Why am I writing about this now? Because of an experience I had a few days ago.
I left my studio, with my good friend and excellent photographer, Ed Bensen, in the car. Ed had seen a restored ’32 Ford pick up in a lot on a road I often travel — within minutes of my studio. I am so into photographing cars that I had to find this truck and its owner to see if he or she would let me shoot it.
As we were passing buildings I’ve passed at least a hundred times, on a whim, I turned into one about which I had been curious, but had never stopped to explore. Eureka — a funky, covered courtyard with bright colors, stone work, odd sculptures, skylights that were diffusing the sun — a very different and interesting place to shoot. I’ve got the name of the owner and I’ll be calling to get permission to shoot there.
Invigorated by the find, knowing how Columbus must have felt, we got back into the car in search of the Red Truck.
But, on another whim, I turned off the road I “knew so well” but obviously had never looked at, and made a right turn onto a side street. Bang. Weathered metal buildings of once bright colors. Period architecture — a lot of it from the 30’s and 40’s (how it survived the gentrification of the area I don’t know, but I do feel its days are numbered). The exact types of locations I’ve wanted for a shoot. In my head, I’ve got a self-assignment I call “juxtapositions” — the mixing of elegant fashion and decaying industrial sites. Within a mile or so of my studio, I found a bunch of perfect locations.
My plan? To go back to the area to get permission from the owners to shoot on their property. When I’ve completed the project, I’ll write it up.
But, until then, I’m going to make sure to look around wherever I am, to really open my creative eyes. I’m not going to cross the lake until I’ve “fished my side”. Beauty is all around us. We just have to open our eyes to see it.
(Copyright: PrairieFire Productions/Stephen J. Herzberg — 2010)







Leave a Reply