

Cool Tools: Sofortbild Tethering Software
I know. Yet another article about tethering? Yes. But, this one will be short. I’ve already written extensively about the topic both in a newsletter article and in a review of onOne Software’s DSLR Remote Pro.
In the onOne review I wrote:
The upside of shooting tethered is: (1) the ability to control the camera without having to work through the menus on the small LCD screen and turning the dials on the camera; (2) the ability to see a much more accurate display of the image on the computer screen; (3) the ability to focus and fire the camera without touching the camera or looking through the viewfinder; (4) the ability to view the actual image on a real screen, not the faux image on the camera’s LCD screen; and, (5) with live view, the ability to get feedback as to what the image will look like BEFORE the shot is taken.
For many, one of the downsides has been finding the right software package. Some cameras come with free software; my Canon G10 did and I’m pretty sure all of the Canon DSLR’s do too. My Nikon’s didn’t. So I bought and use both Nikon’s Camera Control Pro 2 and DSLR Remote Pro. Both are strong performers and to me worth the investment.
But, not everyone can use DSLR Remote Pro; it is an iPhone application. If you don’t have an iPhone — you are missing out on what I believe to be the best software bargain in photography and one of my favorite tools.
Some who are not sure that they will find benefit in tethering, or use it that often, are not ready to purchase Nikon’s Camera Control Pro 2 which has a list price of $180 (to Nikon’s credit, it has a free try it before you buy it, full function, 60 day trial period).
On the Windows side, there appear to be some some solid free programs and some low cost alternatives like TetherPro. I’m a Mac guy so I’ve not been able to try any of them but from what I’ve read they appear to be worth trying.
On the Mac side, low cost alternatives have been hard to find. And, that’s why I was so pleased to stumble onto Sofortbild. It is a “shareware” program. What’s “shareware”? It’s a program we can download and use for free. But, we are strongly encouraged to “donate” to the developer to reward and encourage his efforts. Try it. If you like it, send him some money.
So what does it do? Quite a bit. Let’s take a quick run-through the set up and features:
Step 1: Create a file on the desktop for the captured images. Depending on what you want to do there are a few alternatives. I open that folder in Adobe Bridge. When the images are captured, they are immediately available in Bridge for evaluation or adjustment. Others use the similar, but a bit more complicated, procedure I wrote about in the newsletter to send them into Lightroom. Sofortbild will also open up and send the images to either iPhoto or Aperture.
Step 2: Connect the camera to the computer.
Most of us will use a USB cable.
Caution: If you want to extend the USB cable beyond 16′ so that you have freedom to roam, you should not use an ordinary USB extension. You should use what is known as a “USB repeater cable” which has some form of signal amplification built in. The range of an ordinary USB cable is 16′. The danger when tethering is that with a weak signal, we may drop off the computer and your images will not get to the hard drive — and most of us will not notice until it is too late.
Step 3: Launch the Software and turn on the camera.
 Step 4: Go to the Preferences Panel, seen here, and adjust the settings:
First we identify our desktop file for the captured photos.
We name them. I’ve stopped using DSC and started using my initials; that’s how file naming is set in my camera.
The drop down menu shows that you can import into “None”, Aperture or iPhoto. Since I’m using Bridge, I choose “None”
Even though Sofortbild has a very good viewing window, I probably would not use “Show pictures after capture” because I view and evaluate them in Bridge.
 I really like the optional “Inspector” panel.
It includes an RGB histogram to let us see whether we are having serious clipping problems. (We must remember that this is based on a .jpeg image, because there are no RAW histograms; if we are shooting RAW we have some room for recovery and probably have not “lost” the data.
There is a “Nikon” section with some camera data. I found a big bonus here — it gives me a frame count for all of the shots on my D3. There are a lot of programs that do this for Nikon owners using Windows, but this is the first I’ve found that let’s me do it, easily, on my Mac. The read out tells me that I’ve activated my shuter 8,495 times.
The EXIF and TIFF menus present just what we’d expect them to present. Nothing new here — and not stuff I’d probably need to see when shooting tethered.
But, there is one menu that fascinates me. I love all things technical whether they are helpful or not — the GPS/Google map is one of them. If your camera is enabled for GPS — each time you take a shot the exact location coordinates are entered and a pin shows up on the map. Now, that’s cool.
Step 5: Control Your Camera and Shoot Away — It’s that easy.
Warning: I went a little nuts here — playing in Photoshop to make a composite out of Sofortbild’s main window to show you all of the drop down menus at once. I once heard Jullieanne Kost say that if you are working in Photoshop on a Saturday night — you need a life. Uh. Hmm.
So, here is the main window:

The red bar across the top is what I call a “status bar”; it tells us things about the camera, the lens and some of the settings that must be made on the camera or in its menus. The settings are “dynamic”; as the camera or lens changes, the read out changes.
The red bar across the bottom contains a series of drop down menus that allow us to change shutter speed, aperture, white balance, ISO, and image quality. Note that I had my camera set in “Manual” mode; If I had chosen other modes, I would not have all those choices — for example in Aperture Priority I can choose the aperture but not the shutter speed (because it is set by the camera to maintain the aperture; the opposite would happen if I were in Shutter priority.)
The buttons above the top red bar control camera functions and invoke special settings.

The camera icon activates the shutter. The clock, the Self Timer. The BKT is for Bracketing. The last one is for Interval Shooting. The last three include a lot of easily set options. And, one last thing, as seen on the preferences menu above, Sofortbild has a built in HDR program.
That’s a lot of functionality in a “shareware” program.
As good as this program is, I’m going to stick with Camera Control Pro 2 because it does a couple of things that I need.
Both CCP2 and DSLR Remote allow me to shoot in Live View — which I’m doing a lot, lately.
CCP2 lets me set the camera menu items using the computer; and then it lets me save a set just in case I need to reload them.
However, if you don’t need those functions, or are hesitant to invest a lot of money in tethering software Sofortbild is the right place to turn. It’s simple. And, it works. What more can you ask?
Oh, one last thing. If you do end up using it, send the developer a donation. Let’s support the people who are developing top end programs and “selling” them at reasonable prices.
(Copyright: PrairieFire Productions/Stephen J. Herzberg — 2009)
Related Posts
 Performance Photography Pt. II
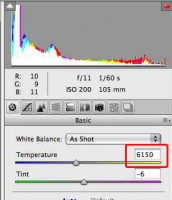 Camera Profiles and the ColorChecker Passport — The What, Why and How
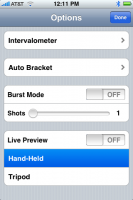 Cool Tools: onOne’s DSLR Remote Pro
 www.kelbytraining.com — Part 1
 www.kelbytraining.com — Part 2
One Responseto “Cool Tools: Sofortbild Tethering Software”
Leave a Reply
foo


Version 1.1b2 of Sofortbild has live view, although I have not been able to get it to function fully when using a D3 – the images are not saved. I am waiting on the developer to tell me what I am doing wrong.