

Camera Profiles and the ColorChecker Passport — The What, Why and How
For a while it was a mystery. I just didn’t get it.
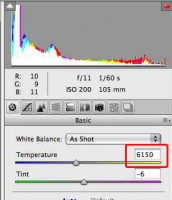
No matter how I set the white balance in my Nikon cameras — be it preset or custom — when I opened my images in either Adobe Camera RAW (ACR) or Lightroom (which are, in essence, the same thing) the White Balance number would be way off. The image didn’t look bad, but the Kelvin number wasn’t right. For example, with the flash setting used on my D3 — which Nikon tells me is set at 5400 — ACR would open the image at 6150 Kelvin.
So, I began to wonder — If ACR was wrong on this fundamental setting, what else was it missing?
Followed by — Why was this happening?
And, finally — What am I going to do about it?
At the same time, the proponents of Nikon’s own software, NX and then NX2 were proclaiming that no one could render a .nef (Nikon’s RAW format) image more accurately than Nikon could. And, they were right.
Out of the camera, NX2 gave me a better starting point than the Adobe software. But, with a bit of adjustment, I was able to get good results with either of the Adobe programs. But, let’s not denigrate the importance of an accurate starting point.
If the idea is to get it as close to “right” in the camera as possible, then the idea should be to get it into the our post production software as close to right as is possible — and for my Nikon images, until recently, that meant using NX2. Said another way, what good is it to work hard to get a perfect exposure in the camera if the post processing software ignores the effort and opens the image to its own specifications?
For Nikon users, the solution might be to use NX2. I am a big fan of NX2; when appropriate I use it. But, because I often go beyond its scope , most of my work is done in the Adobe programs.
And, that’s where the ColorChecker Passport comes in. For the first time, I think I can do that.
The ColorChecker Passport allows me to use the Adobe programs confident that my starting point will be dead on accurate — not just for Nikon cameras in general, but for my individual Nikon cameras. And, not for generic lighting situations but for the actual lighting conditions under which the images were shot. Said another way, Passport makes sure that the image as captured in the camera is the starting point in my Adobe post production software.
Camera Profiles Control the Software’s Starting Point
There is nothing sinister here. No matter the camera, Adobe (and all other post production software developers) want us to have an accurate starting point.
So, the developers create individual “profiles” so as to read the data from each camera manufacturer in the most accurate way possible. For all of us, no matter what camera we shoot, the key is how good that profile is — how accurately it reads and depicts the image as it imports it.
Their task is challenging, especially in a world without a standard RAW format and one in which some camera manufacturers want to compete with Adobe on the software front; in those cases, there have been allegations that the manufacturers have held back information making it impossible for Adobe to get a profile 100% right.
Finally, no matter how bright the software engineers — there are factors for which they cannot account. All cameras are, to some extent, different. A “standard” profile cannot account for the idiosyncrasies in my particular D3 or your Canon. And, my D3 will be different from my friend’s.
Despite the difficulty, the profiles are really pretty good. A tweak here and a tweak there and we can take our properly captured image and get it looking pretty good — the starting points are close enough that it does not take much work to get things right.
But, there is an insidious problem with a profile that is very good but not perfect. We end up making the small adjustments with no standard of reference — we proceed by eye and, therefore, can miss the mark.
Adobe’s Built In Profiles
Most of us have probably not spent much time thinking about the built in profiles. In fact, had I not wanted to know why the WB was off on my .nefs, I would have never done the research that ultimately led to this article.
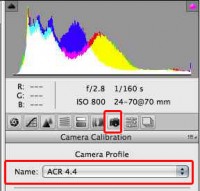
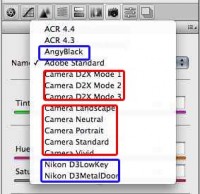
For a long time, I never knew the profiles existed. They are tucked away behind a tab in ACR, in an area I never really used, called “Camera Calibration” — the one shown here with the camera icon. Duh! So, that’s what that was for. Here’s a copy showing, in red, the icon to push to get to the section; notice it shows the standard Adobe profile, also in red; in the second image is the drop down list, itself.
Most of us probably have ACR 4.4 and Adobe Standard. The “D2x” and “Camera … ” profiles were downloaded and installed, a while back, from an Adobe site. They are attempts to more specifically replicate the output of Nikon cameras — with the latter set corresponding to the Nikon “picture control” modes that one can pre-set in the camera.
What you say, only Nikon profiles? No, but this is what you see on a .nef. If I had opened a .CR2, a Canon RAW image I would have seen different options.
The profiles in the dark blue frames are those that I created using the Passport; we will get to them, later.
The bottom line is that the Camera Profile is the starting point for all of our post-production work. The more accurate it is, the better our outcome will be.
So, the question is: How do we get accurate profiles.
For me, the answer is X-rite’s ColorChecker Passport.
Creating Our Own Profiles with Xrite’s ColorChecker Passport
In a sea filled with gimmick devices and promises of color correction panaceas, the X-rite ColorChecker Passport is the real deal. It is an easy to use, fairly priced hardware/software solution that allows us create and load custom camera profiles into ACR and Lightroom.
It’s elegance is in its simplicity.
It proves one of my core philosophical underpinnings “Less is more”.
With the Passport, anyone — no matter how unschooled in color theory or unsophisticated in the intricacies of ACR — can quickly create a profile/starting point that will make post-production adjustments easy and accurate.
What’s in the Box?
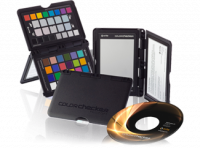 A small, unobtrusive, carry it in your pocket or around your neck, device containing three targets and a software disk. That’s it. The elegance is in the integration of the two components.
There are three “targets”.
The one on the bottom left is the 24 patch “Color Classic”. It’s used by the software to create the profile.
The one above it is the “Color Enhancement” target; it can be used to induce creative color shifts; for example there are several shades of gray that can be used to warm or cool white balance. It can also be used to make sure we are not losing shadow details or clipping highlights.
To the right of the double target image, we see the Passport opened to show a gray card that can be used as a target to custom set one’s white balance.
Putting it to Work
Photoshop, Bridge and Elements
Step 1: Load the software. Depending on which Adobe programs you have and how you invoke ACR, the installer will do one or both of the following:
For Photoshop, Bridge, and Elements — all of which use versions of ACR, X-rite installs a stand alone application. Whereas Lightroom is a one stop shop, these other programs invoke another step, the use of the ColorChecker Passport application. It’s one more step but still magic.
For Lightroom, it installs a plug-in/preset that will find the target in an image and create a profile. It works behind the scenes and is absolutely amazing.
Step 2: Take a reference image with the target in it. This is pretty simple. If taking a picture of a person, have them hold it. If it’s a product shot, I use the built in easel function to put the targets in the picture.
A couple of things to watch for: Make sure the light hits the target in the same way that it is lighting the subject and that the target is evenly lit. And, make sure the target image is around 10% of the picture. If it gets much smaller than that, the software may have a hard time finding it.
Step 3: Open the image. As I mentioned, there are two ways to do this depending on whether you start in Lightroom or Bridge/CS4. Whichever way you create the profile, it will be stored in the same place and work in all Adobe programs that process RAW images. I’ll do it both ways for you.
I’ll start with the independent application route — the route I take because I’ve pretty much abandoned Lightroom and usually start in Bridge.
First, I opened the image in ACR — AND DID ABSOLUTELY NOTHING TO IT — NO ADJUSTMENTS, NOTHING.
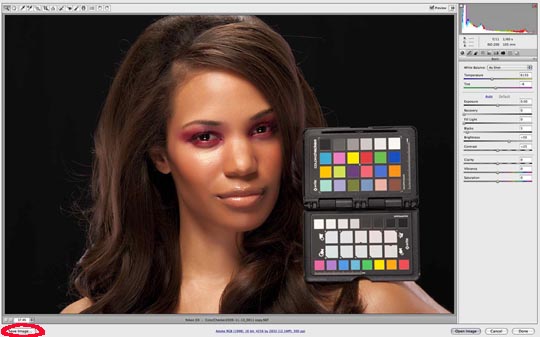
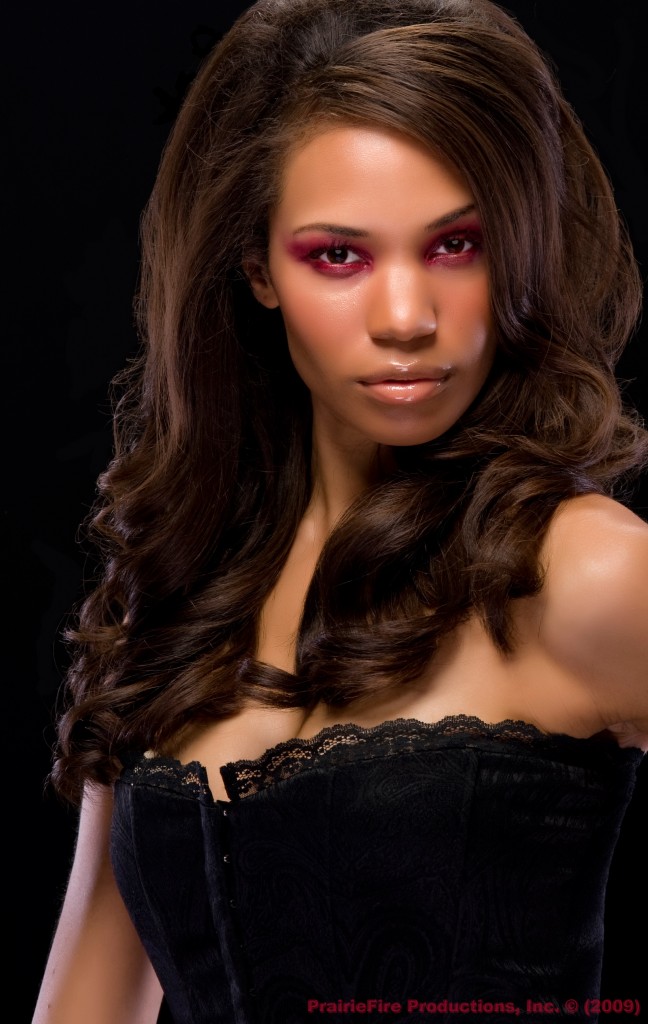
Here’s the reference shot I took during a session with Page Parkes model Angy Torres. Angy’s make up was done by MUA Tree Vaello.
(I’ll have a lot more on these two later and in future articles. Both are superb at what they do and were kind enough to help me get the images for this review. Unfortunately, these images are dumbed down for use on the web; the lower resolution does not do justice to Angy’s beauty and Tree’s fine make up.)
The next step was to save the image as a .dng file. This is Adobe’s universal RAW file — a format into which we can convert all of our RAW images, without regard to our camera brand. The advantage of .dng is that Adobe guarantees that all of it’s future products will be able to process .dng images. There are no guarantees that the same can be said for their ability to support the .nef’s I took years ago. It is a good, safe format and I should use it more.
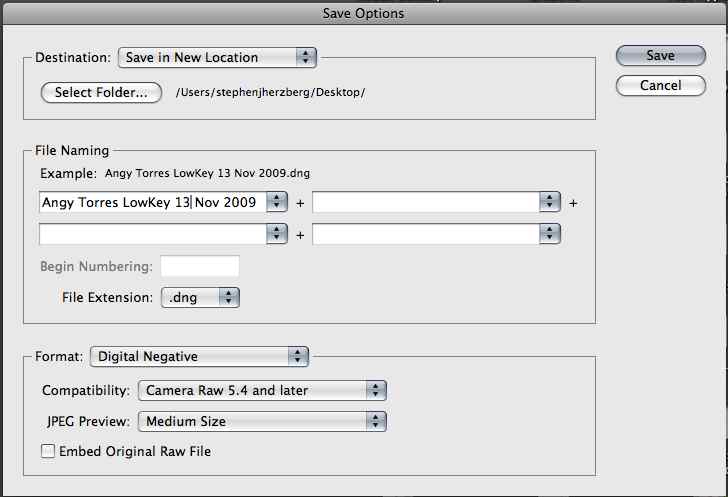
Having done nothing to process this image, I hit the “Save Image” button in the lower left corner of the window (circled in red). The “Save Options” dialogue box opens.
Nothing hard here — the critical thing is to make sure to save it as a .dng — in the File Extension drop down menu. I gave it a distinct name and put it on my desktop because I was going to immediately use it in the stand alone application.
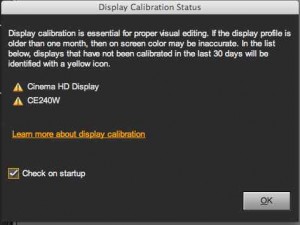
Step 4: Create the profile in the ColorChecker Passport application. I opened the application and got the following warning screen. Bad me. I hadn’t calibrated my monitors within 30 days.
So, I stopped, pulled out the colorMunki, and made sure the monitors were just right.
This warning is beneficial. What’s the use of being so careful with the camera and creating spot on profiles if the monitor is off? A strong starting point demands an accurate monitor.
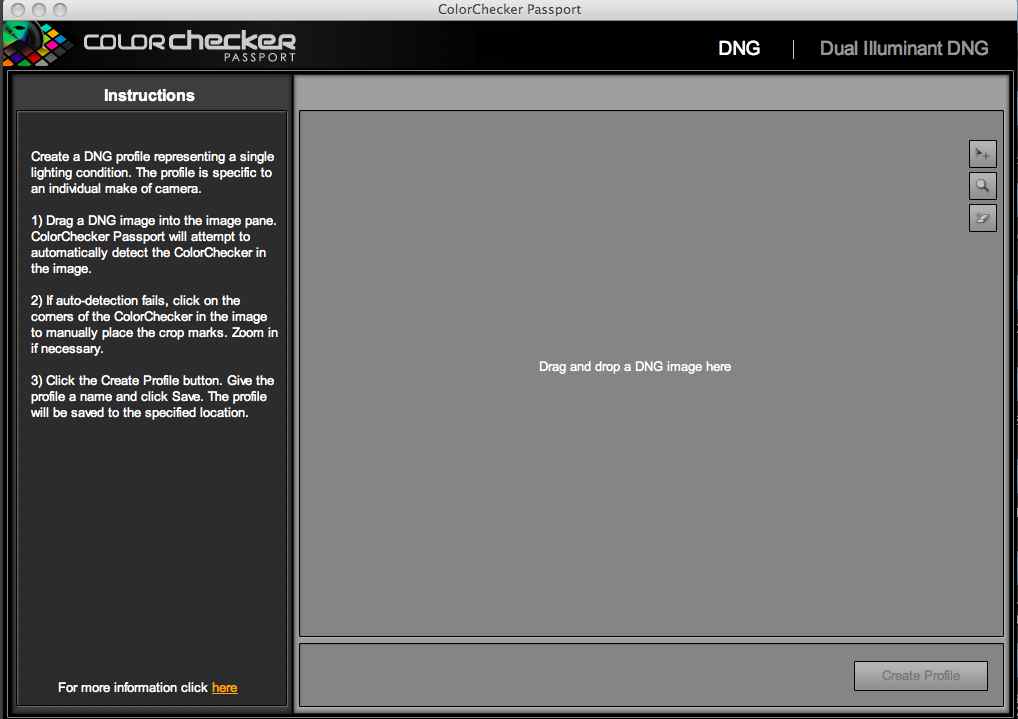
Here’s the working window of the application:
Nothing could be easier to use. The full instruction set is on the left. I dragged my .dng to the center and clicked create a profile
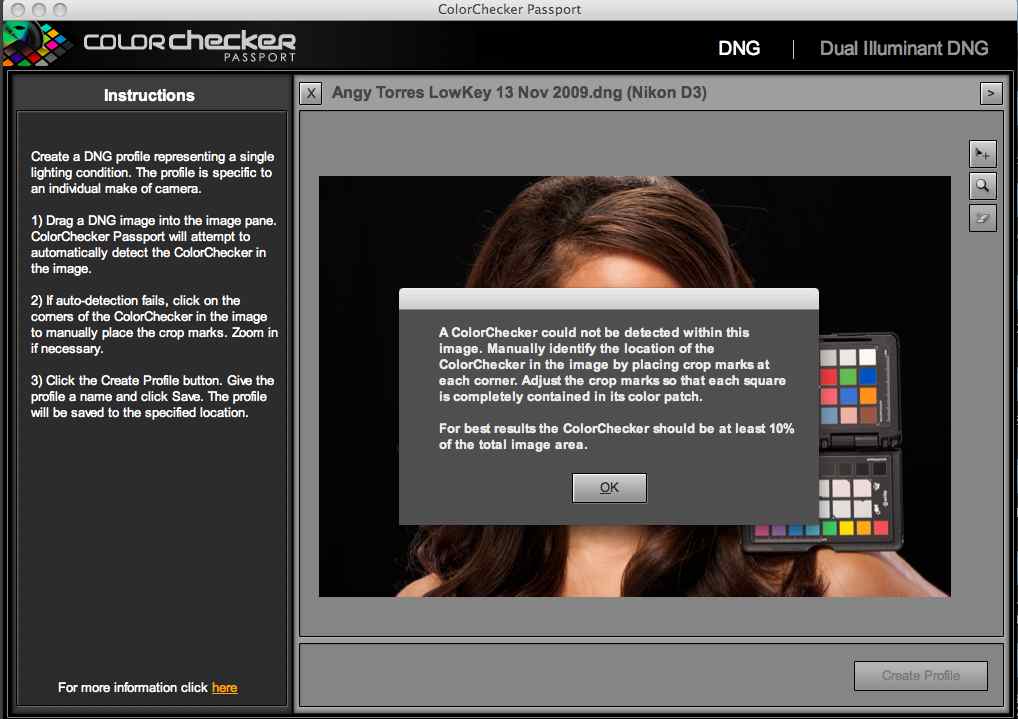
And, here I had a lucky moment — at least lucky for teaching purposes. I got the following window telling me that the target was not taking up 10% of the image and that I’d have to help the software find it.
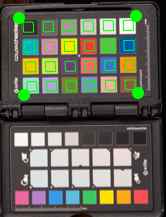 (Now that I’ve got the hang of this, I make sure my target takes up more of the image space. But, the cure is simple, as seen here.)
To help the software find the target, you take the crop tool and put a green dot at each corner of the Classic target — which in this case is the upper target. Line up the corners so that the little green boxes are inside each of the color patches.
Don’t make the mistake I did the first time I tried this. Use only the Color Classic target, not both.
Having isolated the target, push the “Create Profile button. You’ll get a dialogue box asking you to name the profile. The default is “Nikon D3.dcp” for  a D3. I don’t use that name. I change it to something much more specific with a date and lighting scheme involved. If not, every profile would have the same name and I’d not know which to use or how to manage them. Hit save and the profile will be created and stored.
One final thing — if the application within which you are going to use the profile is open, you must close and re-open it. When you re-launch the program, be it Photoshop, Bridge, Lightroom, or Elements, the profile will be in the list shown above.
Don’t be put off by the length of the step by step, written description of the process.
I made this profile in a couple of minutes. It is fast and very easy.
Lightroom
Using the passport in Lightroom is equally easy and a bit faster. The advantage here is that you never leave Lightroom.
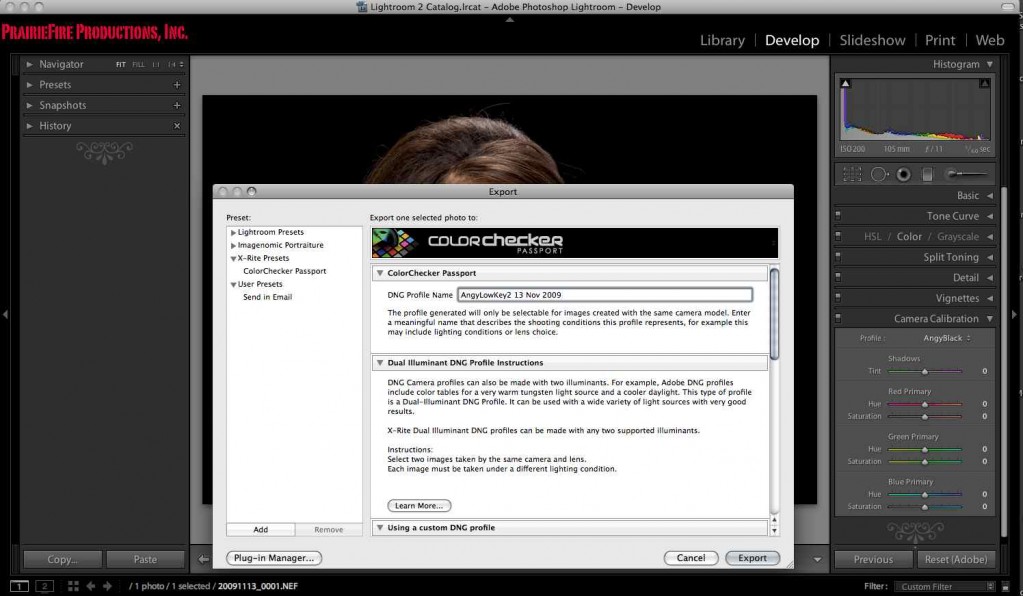
Step 1: Open your image in Lightroom’s “Develop” module. And, then the magic begins. Without us having to do a thing, the Passport software finds the target and creates a profile.
Step 2: Go to File>Export in the menu bar. The following window will come up:
Name the profile, hit the “Export” button and you’re done. The profile is created and stored with all of the other profiles.
Once more, you have to remember to close Lightroom and then reopen it so that it can load the new profile.
Using the Custom Profile and Target Shot
OK, so we’ve created a profile. Now what?
Well, lots of things.
I take the target shot right back into ACR and use it create the baseline set of color corrections I will use for all of the shots taken that session with that camera and lighting pattern. Once I have things the way I want them, I will batch process all of the shots to my chosen standard.
1. Select the Custom Profile
2. Correct the White Balance:
Important Point: The custom profile we created with the Passport does not change our WB value. We have to do that on our own — for good reason. There is some creative judgment to be exercised here and the Color Enhancement target gives us the tool needed to experiment and dial in our preferred, fine tuned White Balance.
Shame on me. I don’t custom white balance before each shoot UNLESS I am in some very odd mixed light situation — like a church or football stadium. And, in those cases, I don’t shoot a target, I use my Sekonic C500R color meter and dial in a specific Kelvin number — which, unfortunately, Adobe will partially ignore. Most of the time I use a preset — for Angy’s shoot, I used the Nikon flash setting. Outdoors, I prefer Cloudy.
How does the Passport help here? On the Enhancement target, It gives me a series of gray patches one neutral, some warmer and some cooler to use in setting the proper White Balance.
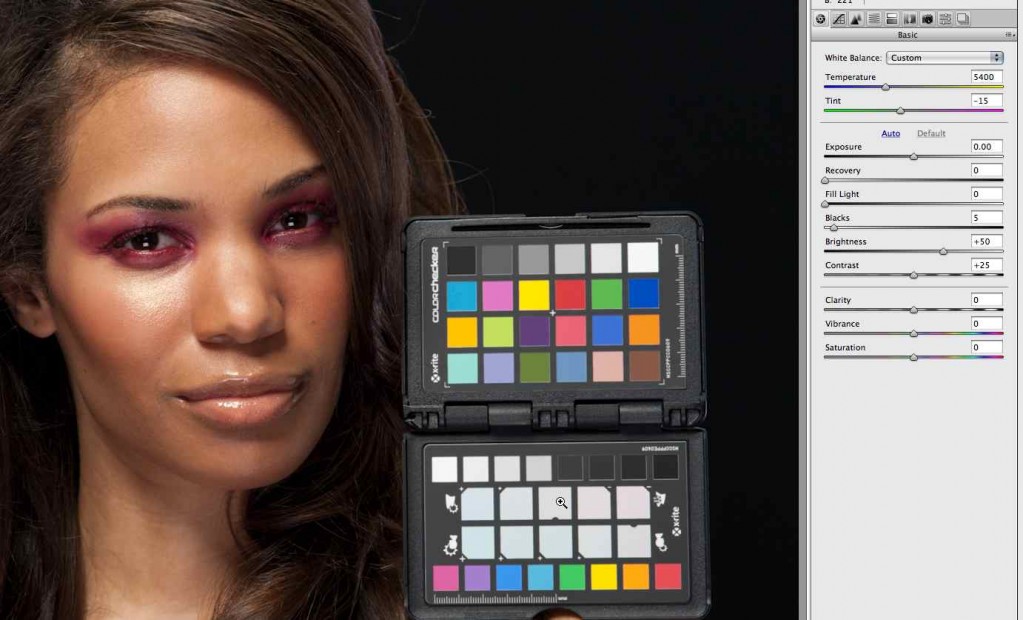
Take a look at this shot from ACR.
Notice I’ve taken the WB tool from the top and placed it on one of the gray patches(bottom target, 3rd in from the left, upper/middle row). Now, look at the Kelvin degrees on the right. An image that was imported at 6150 has been corrected to a proper 5400. All with one click.
Why am I so cavalier about White Balance? Because I shoot RAW. When I shoot RAW the camera captures all of the data to hit the sensor — it throws nothing out. In post-production I can change anything and everything to get the exposure and color where I want it to be. All I need is an accurate starting point in ACR and I’m good to go. The Passport gives me that starting point.
If you shoot .jpegs, you will probably want to use the Passport’s white balance target to set the camera before the shoot. And, there are several other things you will want to do with the targets before you get going. For example, you might want to use the target to check your exposure to ensure that you are not clipping the highlights or losing detail in the shadows. Why? Because, once you start shooting .jpegs, the camera is throwing out information in order to compress the images. With that information gone, you ability to make corrections in post-production is limited.
(For more on the advantages of shooting RAW, you might want to read part of this article I wrote a while back.)
3. Batch Process: I batch process all of the images taken in that session with that camera and same lighting pattern to set the exposure and color profile. Note I said in that session. If I change the lighting, I shoot a new target. On the same set, that’s probably a little anal. But, I did take Angy onto another set, one in which I used my Profoto 600BR and a Ringflash in a mixed lighting situation and shot new targets.
4. Did all of this make a difference? Yes, definitely. But, the difference was subtle as one would hope it would be. The Adobe profiles were close. But, as they say, “Close only counts in horse shoes.” I definitely got a better starting point using the custom profile. Clicking between Adobe’s and mine, I could see a clear shift in color and tone. Said another way, slight color casts were removed and Angy looked like Angy. I could ask for nothing more.
Some Final Thoughts on the ColorChecker Passport:
There are other functions the Passport will help us:
One that I’ve not tried is the “Dual Illuminant Profile”. The idea is to combine two targets from different light sources to create one more general target. For example, if you are moving from rooms with tungsten lighting to outdoor daylight, you take a target shot in each area and the software will allow you to combine them into one profile. I’m a bit skeptical about the value of this and until I try it I won’t recommend it. In that situation, I’d take individual target shots and make individual profiles. In post-production I’d sort my shots and process all of those shot in daylight with my custom daylight profile and those shot under tungsten with that profile. But, to be fair to the Passport, until I try the Dual Illuminant I can’t really say anything about its value.
The main targets in the Passport are “consumable” and require careful treatment. These are better protected, more rugged versions of our old Greytag Macbeth cards — those expensive bigger versions of the Classic that required very special care. In order to get the right colors and surfaces, they are printed on special paper. Put an oily fingerprint on them and the color and reflectivity change. That’s why it’s important to handle them by their plastic edges and store them closed, safe in their plastic clam shell. The way the Passport is engineered, it’s easy to protect the targets.
There is one thing in the software I’d like changed — and from what I understand, a change is on its way. I’d like to be able to manage the profiles — discard the older ones after I’ve used them — so as not to clog or confuse the drop down menu. To do that, today, on a Mac I have to go to User>Library>Application Support>Adobe>CameraRaw>Camera Profiles and manually remove the profiles I no longer need. Until the profiles are easy deleted, I think it’s wise to give them very distinct names and to date them. That way, there will be no confusion as to which to use.
These quibbles aside, I really like the Passport and will use it on all of my shoots wherever they may take place. It’s nice to actually get something that works the way it is supposed to work — a product that helps us get the most out of our images. And, one that does not require and advanced degree to understand and use.
I like it so much I’m going to get another one so I can leave one in the studio and have one with my everyday “carry camera”.
A Few Words About the Shoot
The creative team was model Angy Torres, MUA Tree Vaello, and assistant Tom Folger. Tree’s participation was made possible by her sponsor — La Mer skin products.
The mission was simple — get some shots for use in this article. In addition, we decided to get a few head shots for both Angy and Tree to use on their websites and in their books.
It was easy to work with Angy. She’s got a great sense of humor and “go with the flow” attitude — but, when needed, she could be fierce. She’s definitely on my A list. She can be reached by contacting her agent Erik Bechtol.
We used two lighting set ups; the glamour lighting pattern described here and a Profoto Ringflash shot onto a metal door background. I shot a reference shot for each set up.
Here’s one of the head shots. After using the custom profile, there were no color corrections of any kind made.
But Wait There’s There Will Be More!!!
I’ve been looking to add a make up artist to my team for quite a while. In Tree Vaello, I think I’ve found the perfect collaborator.
My first rule, no “high maintenance” people. Can’t deal with that. Tree is, as we’d say in California”mellow”. But that calm and cooperative demeanor hides the passion and fire of a true artist. Her work is amazing.
Truth be told, I’ve never worked that much with MUA’s.
So, I thought a cool article would be an interview with Tree as to what we, as photographers, need to do to get the most out of an MUA’s talents.
I’ll do it soon. Have some questions you want me to ask her? Send them in.
(Copyright: PrairieFire Productions/Stephen J. Herzberg — 2009)





You mentioned in your article that you sometimes use a Kelvin reading from your color meter. That’s OK if you have a good reason, but I can’t imagine what it is. If you’ve got a gray balance card there’s no advantage to this step at all. As soon as the white balance eyedropper is used in ACR the “as shot” kelvin is ignored by ACR. Besides, if you preset your camera with a kelvin setting then you will not have the camera’s auto WB (as opposed the ACR’s auto setting) as an “as shot” option, which can be handy sometimes. I think it makes much more sense to sell your color meter on Ebay and save yourself a useless step.
Actually, there are a lot of reasons I think my color meter is one of my most important tools.
First, I never use Auto White balance; following the teachings of Jim DiVitale, I use one WB per lighting set up and stick with it. Then I do a batch correction.
Second, there are many time when I shoot and using a Gray Card will not work — especially shooting sports in stadiums with odd lights or in places with multiple types of lights/mixed lights. I take a Kelvin reading, set the camera, and remember the Kelvin reading. I then dial it in in ACR as a starting point. I have found lighting temperatures I never knew existed and for which Auto did not work and for which there was no camera preset — like some forms of sodium vapor lights.
Third, there are times when you go into an environment and are going to used added flash to create direction or clean up the light. I use the color meter to find the ambient temperature and then gel the flash to match it. I could not do this without the meter.
In the studio, or with normal outdoor shooting, I don’t use the color meter — no need to. My Profoto lights are dead on when it comes to WB. And, I usually use a preset for sunny or cloudy outdoors.
Summary: The color meter is invaluable in odd, changing or mixed light situations, when one is shooting in multiple environments, or when one needs to figure out how to gel a light source to bring it into conformity with others.
Thanks for raising this topic.
Steve
Color meters are useful for eliminating color crossover by matching studio strobes and strobes to sunlight. I’m not adept at photoshop so this eliminates costly or time consuming color fixes. Since color changes as flash tubes age, a color meter helps to consistantly produce professional images in the shortest time possible, especially for faster turn-around.
Thanks for this article. Do you have any experiences in deleting profiles and working on the files afterwards? Like, what profile will LR show when the profile doesn’t exist anymore, and can you still chance things like WB?
I’ve yet to remove a profile so I’m not sure which profile will show up when working on an image whose custom profile was removed. It will probably be one of the Adobe standards. I’ve sent the question to friends at X-Rite and will post their answer when I receive it. Or, I will experiment and post an answer myself.
However, I do know that you can change the RAW image in any way you want. Like all other RAW adjustments, the profile simply becomes a part of the “instruction set” that travels with the RAW image. It does not touch or alter a pixel in any way. That is the beauty of RAW processing. That’s why the profiles are simply very accurate starting points. Where we go from there is driven by our artistic vision.
Steve
UPDATE: I got a very quick response from Joe Brady of the MAC Group who is their X-Rite expert. My answer above is correct. (Whew!) So long as we are dealing with RAW files EVERYTHING can be changed. And, when the profile is removed, there will be a default to an Adobe profile (or you can choose whatever profile you want.)
Joe throws in one important detail — once you convert from RAW to any other format, be it .tiff, .jpeg, or .psd — that profile becomes embedded and nothing will change if the X-Rite profile is deleted.
Joe points out one last thing. As the article mentions, WB is separate and distinct from the profile; they work together — but they are not tied together. Color temperature can always be changed, without regard to the file type.
I was also taught by PPA Master Photographer Don Emmerik in the early days of digital photography to set my kelvin temperature on the camera and correct from a known value later. What this does is standardize the “processing” of the images, just like film days and allows one the be consistent. If you would like to read a book to see how a system of digital processing would work and the reasons for it, read “Black & White Pipeline” by Ted Dillard and you’ll understand why standardization is important. When we calibrate our monitors we are standardizing them, Right? Talk to Eddie Tapp.